Isn't it great that we have holidays now and again? Finally I find the time to sit and create, and the results are cards for challenges in a row...
So here's my card, and after the list of challenges It's entered into, I wrote a little tutorial to creating it.

Here are the challenges it's entered:
AUD Sentiments - Anything Goes
Karen's Doodles Challenge Blog - Lots of Layers
Etsy Inspired - Creating is fun
Ann's Creative Nook - Anything goes with a technique
Cupcake Inspiration - Inspiration photo
Sketchy Colors - sketch
Stamp With Fun - Birthday
The Pink Elephant - color combo
A Spoon Full of Sugar - Let's celebrate
And here is the tutorial on making this card:
1. You start by choosing the papers, and cutting them to size.
In this photo - from left to right:
14 X 10.5 cm (5.5" X 4.2") (paper A)
12 X 6 cm (4.7" X 2.4") (paper B)
8 X 6 cm (3.1" X 2.4") (paper C)

2. Ink the edges of the two smaller papers (B, C)

3. Stamp your image on a white or cream cardstock, cut around it in an oval shape, and ink the edges.
Make sure it is smaller in width than 6 cm (2.4") and no more than 8 cm (3.1") long.
(smaller in width than paper B, and no more than 2/3 B's length)


4. stamp youe sentiment on the same cardstock, cut around it to a rectangle shape and punch-circle the corners. Ink the edges.

5. Take another coordinating paper, punch it's border and cut it to be 1.5 cm wide (0.6")

6. Now we have all our components, it's time to put it all together.
Take paper C and glue it onto paper A, in the center.

7. Take paper B and glue it on top paper C, again - centered.

8. Add your stamed image. Position it like in the photo.

9. Add the punched border. Make sure to position it below the stamped image, but not too low. We want to glue the sentiment a little over it...

10. Now add the sentiment, a little over the punched border, and a little over the stamped image:
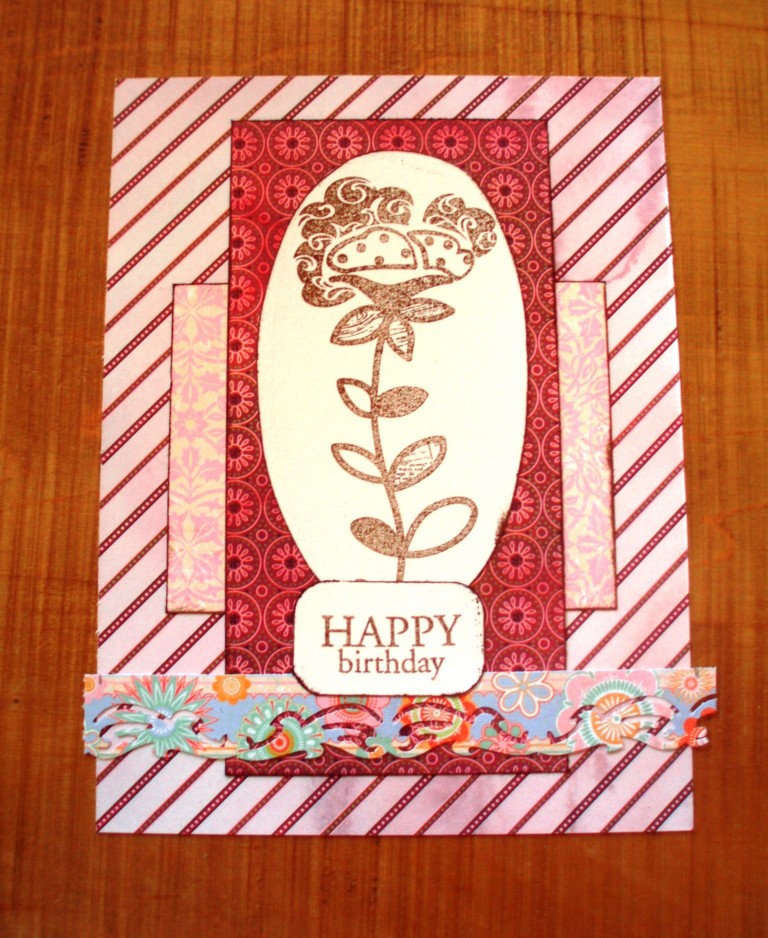
11. Now it's time to finish the card: Trim the excess of the punched border at the sides of the card, and add your blings.
Glue the whole thing onto a folded card, and you're done.
If you decide to create your own version, please share it with ne in the comments section. I'd love to see what you did.
Enjoy,
Dailly


12 comments:
Beautiful card!
Thanks for playing with us at Stamp with fun.
~ Heike
So pretty! Thanks for playing along with at Cupcake Inspirations this week!!!
Very beautiful card, and nice tutorial!:) Thank you so much for playing with Sketchy Colors this week, and good luck to you!:)
Hugs, Ellen:)
(I have a "big candy" i my blog, and if you're interested, you're very welcome to join it!;)
http://scrappellen.blogspot.com/
Very nice card!
thanks for playing at THE PIXIE COTTAGE
hugs
sadia
very pretty card
Thanks for playing along with Karen's Doodles
Anne x
This is so pretty! THANKS for joining us at Karen's Doodles this week!
Hugs, Chris
What a beautiful project. Thanks for joining us at Aud Sentiments and celebrating our 1st Birthday with us.
Hi What a fantastic card. Great tutorial too! Thanks so much for joining us this week at the Pixie Cottage!
Denise
PC-DT
great step by step of your card! thank you for sharing at the pixie cottage!
Lovely Birthday card!! Thank you so much for playing along with us at The Pink Elephant!!
Sheri-TPE DT
Lovely birthday card!great tutorial too.
Thanks for joining Coloiur Create This week!
Hugs Di xxx
A really lovely Birthday Card and a Great Tutorial Dailly!
Thanks for sharing your card with us at Colour Create for the Pink, Blue and Brown Challenge.
Sharon x
Post a Comment